Wednesday, July 17, 2013

5 Preparations For A Successful Studio Visit


As you can see from the photograph, there are a lot of projects underway in the studio, which is great. It's like a cozy cave of self indulgence. But for the uninitiated visiter it's visual chaos, bordering on a  hoarder's hovel.

This week I have a studio visits lined up with Heyd Fontenot from CentralTrak. I personally reached out to him, asking if he would come by my studio to look at a few art projects. The focus of this visit will be on the World Of Nomadic Fungi, a joint project I'm doing with the Nomadic Fungi Institute.

Inviting someone to visit your studio is not to be taken lightly. You are asking them to go out of their way and spend their time indulging your need to have someone look at your artwork. You also have to keep in mind that your time with them is limited, somewhere between 1 and no longer than 2 hours. So, part of presenting yourself as a professional artist means having the artwork and the topics of discussion organized.

As a lot of you know, I spent last year cruising around on the Queasy Tugboat. This visit with Heyd is the first conversation I have had about my artwork with a respected art professional in quite sometime. I'll admit I'm having some anxiety and loosing a little sleep. To combat the jitters I made the following To Do List for myself:

1. Select/edit the artwork I want to focus on. Arrange it so that the visitor can see it without too much competing visual clutter. It should be mainly finished work, but a few works in progress mixed in is a good thing. The finished work is after all my product, what I will be showing to the public. And the works in progress show that I have new and exciting things coming up soon.

2. Decide what are the important topics I want to discuss. I am well aware that once I get started talking I can ramble on and on about art, art concepts, artists and the art world in general, and never get around to talking about MY artwork. So make a list that I can refer back to if/when we get too far off topic.

3. Next, I invited this person because they have skills and talents that are relative to what I am doing in the studio. So, create another list, this one focusing on their special skills and experiences. Make sure to incorporate this list into relative questions; You have experience working with alternative exhibit spaces, How do you approach people/businesses about setting up an exhibit in their space?

4. Talking is dry work, and listing sometimes requires a cool beverage to make things easier to swallow. Think about a gallery opening without wine and cheese. People simply don't linger when their hands are empty. Make sure there are beverages to offer;  wine, beer, lemonade, sparkling water.

5. Lastly, burn a CD with an up to date CV and good images of my artwork. Don't forget to give it to him before he leaves!

Well, looks like I have everything covered. I should sleep like a baby tonight.... Wait a minute,  I haven't even started cleaning up the studio!


Tuesday, June 11, 2013

Snow Globe or Lab Specimen

Been working on a series of sculptures that walk the line between snow globe and lab specimen.

I've never made a snow globe before, so I turned to the world of DIY videos. It's surprising how many  there are out there, and how 90% of them are doing it wrong. For one thing, you have to submerge the globe in water while putting the lid on, other wise there is no way to prevent air bubbles.

I know what you are saying, Well mister smarty pants, I see an air bubble in your snow globe! Yes you do, and that is because I didn't presoak the ceramic sculpture before putting the lid on the globe. That air was trapped inside the pores of the ceramic. Who would have ever thought of that?

You might also be saying, Looks a little green inside that magical wonderland. That's probably due to the algae feeding on the proteins from the egg shells. Egg shells and mother of pearl are what they used before the invention of plastic snow flakes. That said, I kind of like the green. It adds a bit of realism to the old, musty lab specimen effect.

Wednesday, May 1, 2013

The Next Big Thing...

Well I don't know if Pinerest is going to really be the NEXT big think, but there is a lot of buzz around it, so I signed up for it. Wouldn't you know that my name is already taken. (One of the reasons to sign up early on these kinds of social networks) So here is the HTML address I ended up with http://pinterest.com/bradfordsmith13.

After you look through my stuff and move onto the sea of pictorial rabbit holes known as Pinterest, you will loose hours of your life looking at all the wonderful pictures that people have pinned.

As for weather Pinterest is a useful site and not just a time suck, I haven't decided yet. I have seen lots of wonderful art that is of a much higher quality than what I have found on Flicker.

The original Pinterest idea was that people would pin images that would link back to the original web site. I have found some new artists websites already. But! A good portion of the images have been detached from their original source, so they now float around the Pinterest sea being pinned over and over without the artist getting any credit or recognition.

Sunday, April 21, 2013

A Week With Li-Qua-Che 4.0

Li-Qua-Che, Brad Ford Smith
This is our fourth and last Li-Qua-Che project. This time we are creating a small one piece mold that will be used to cast both sides of an object. The photo above shows the oil clay model of a 4" nubby club just before pouring on the plaster.

Li-Qua-Che, Brad Ford Smith
The nubby club is framed by plastic retaining walls to create a form to pour the plaster into. The model and walls are lightly sprayed with PAM as a release agent. 

Li-Qua-Che, Brad Ford Smith
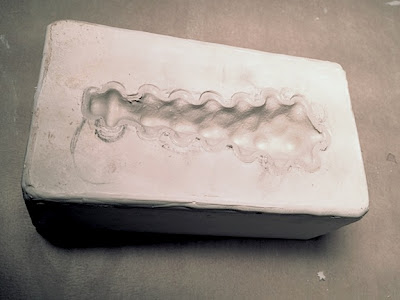
Here is the plaster mold after hardening. It still has the oil clay club in place which came out easily with the help of a pick to grab the oil clay and lift it out.

Li-Qua-Che, Brad Ford Smith
The mold is cleaned with a little naphtha to remove any oil residue. Now is also the time to clean the mold of any surface anomalies. 

Li-Qua-Che, Brad Ford Smith
The mold is filled with Li-Qua-Che. After waiting 5 minutes the Li-Qua-Che is poured out leaving behind a 1/8" leather hard layer of Li-Qua-Che in the mold. In the photo you can see the Li-Qua-Che shell is pulling away from the plaster walls as it dries and shrinks.

Li-Qua-Che, Brad Ford Smith
Here are the two cast sides pulled from the same mold. In theory these two sides should fit together perfectly. But due to the shrinkage ratio of the Li-Qua-Che, the edges shrink back more than the surface areas. This creates edges that are thin, pointy and uneven.  Keep that in mind when building your model. All edges need to be extended so that in the edges of the finished casting can be sanded back to create smooth even joins.

Li-Qua-Che, Brad Ford Smith
So, here is the nubby club glued together and the seams filled with spackle. Note that the surface shows finger prints and boogers found on the original oil clay model. If you don't clean up the model and/or clean the surface of the mold, you'll be cleaning those finger prints and boogers off every casting.

Well, That concludes our week of playing with Li-Qua-Che. I haven't even touched our projects that used two part molds. But I think that's more than enough posting about this topic. Any more and I will need to open an online Li-Qua-Che store, and that would expose me to way to many questions pertaining to doll heads.


Thursday, April 18, 2013

A Week With Li-Qua-Che 3.0

Due to the Dallas Art Fair with 83 galleries, multiple lectures and a few side art events, plus posting about the art fair for Art and Seek, these last two BFS blog posts about Li-Qua-Che had to be postponed until this week. Anyway, back to fun with liquid paper mache... Size does make a difference.

Li-Qua-Che, Brad Ford Smith
In our past Li-Qua-Che projects we made large tiles that had issues with de-molding, warpage and strength. In this project we scaled down the tile to 5"x 8". We also dropped the idea of incorporating open areas/holes into the design. Above is our smaller finished tile after curing over night. You can tell by the surface that it still needs some light sanding with 0000 steel wool to smooth it out.

Li-Qua-Che, Brad Ford Smith
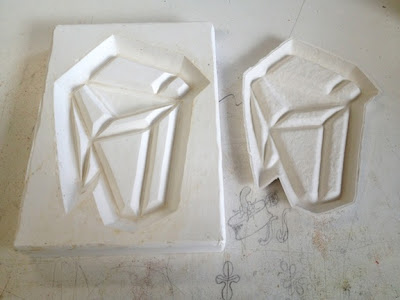
This photo shows the plaster mold and the back side of the cast tile. The compactness of this tile design avoided issues of warpage. The tile also held up to the stress test of being dropped on the floor. (An accident that we will take credit for doing)

We did notice that the edges of the tile were a bit ruff. With that in mind, when designing a one piece mold, the model should be fabricated a little taller so the ragged edges can be sanded down to form a straight, smooth edge.

Tuesday, April 2, 2013

Discovering Free Dallas Art Fair Tickets

The fifth annual Dallas Art Fair is just around the corner, and with 83 galleries in this years line up, 40 of which are first time participants, I am starting to get really excited to see some new and exciting artwork.

While perusing the local media coverage for this event I discovered two wonderful things which I am very excited to share with my BFS Blog subscribers. First is the new art and entertainment website CultureMap. They have been around for a while but I just found out about them.

The second discovery is that CultureMap in their post Enthusiasts Experience Dallas Art Fair for Free on Professionals Day posted a pass code that allows you to purchase free tickets to the Dallas Art Fair!

NOW you have no excuse to miss the most important art event in the DFW metroplex!

Tuesday, March 26, 2013

A Week With Li-Qua-Che 2.0

Li-Qua-Che, Brad Ford Smith
This post continues with our week long experiments with Li-Qua-Che. The photo above shows design model #2. The cork sub-straight has been gessoed and oil clay has been added to smooth out and build up the surface.

Li-Qua-Che, Brad Ford Smith
This is the plaster mold pulled from the above model. It has cured in the oven over night. The mold measures about 12" square.

Li-Qua-Che, Brad Ford Smith

And here is the finished Li-Qua-Che casting. The Li-Qua-Che picks up every detail including scratches and finger prints. So make you model as smooth as possible, and then smooth the walls of the plaster mold as well.

There was some difficulty getting the casting out of the mold, but with the help of a small pallet knife, it finally came free. The real issue was that while the casting was sitting on the table curing, it began to sag and warp.

Summing up our experiments so far, this material is surprisingly strong, but it has size limitations. It will not hold its shape if casting a single sided tile over 10" in size. With that in mind we'll move onto designing two more projects; a smaller 8" tile, and an object that is similar in proportion to a doll head.

Here's a link to some more Li-Qua-Che tips at Konittajo's Playhouse.